Travelling with your bike doesn’t have to be a hassle. In this ultimate guide, I provide tips and advice on how to pack your bike and travel stress-free.
Are you a cycling enthusiast like me, looking to embark on the ultimate bike adventure? Dreaming of exploring new destinations and picturesque landscapes on a cycling holiday? But are daunted by the idea of travelling with your own bike? Then you’ve come to the right place!
As we are travelling to more destinations as a company, (visit here to see our latest tours, Port Velo Cycling Tours), I have decided its about time I upgraded my bike bag to a bike case, rather than keep borrowing or hiring one.
This has focused me to write this article, where I will dive into the world of hassle-free bike travel and explore the ins and outs of travelling with your beloved bike. Whether you’re planning a solo bike tour or joining one of our group adventures, I have you covered with all the tips, tricks, and information you need to ensure a smooth and enjoyable travel experience. So pack your bags, saddle up, and let’s venture into the exciting world of bike travel!
Why Travelling With Your Bike Doesn’t Have To Be a Hassle: Benefits and Considerations
Once you’ve chosen your destination, it’s time to consider the duration of your trip, the number of cycling days, and the distances you’re covering each day. If you are on one of our multi day tours in the mountains you may want to consider taking your own bike rather than hiring a companion that might not suit your style of riding or even worse not fit you correctly and the saddle isn’t the right one for you.
One of the biggest advantages of flying with your bike is the familiarity it provides in the knowledge that the bike is setup for you, you also have your saddle, I cannot stress how much this matters! Ultimately ensuring a more enjoyable and comfortable cycling experience.
Another benefit of traveling with your bike is the cost savings it can offer. Rather than renting a bike at your destination, which can be expensive and may not meet your specific needs, bringing your own bike can save you money in the long run, although the initial investment in a bike box may seem high.
Bike Packing
When it comes to flying with your bike, proper packaging is crucial. The age of turning up at the airport with an unpacked bike is long gone. Always ensure your bike is stowed securely, whether you’re using a dedicated bike bag, a hard-shell case, or a specialised cardboard box. Investing in a sturdy bike box or bag will protect your bike from any potential damage during transit. It’s essential to disassemble and pack your bike appropriately, following airline guidelines and ensuring all components are securely fastened. While the packing process can be time-consuming, the peace of mind knowing your bike is protected makes it worth the effort.
Typically, wheels, pedals, and handlebars need to be removed (this is not always necessary for some Road & Triathlon Bag/Cases)
Electric Bikes
If you’re travelling with an electric bike, be aware of airline restrictions, batteries over 160WH are prohibited. While every airline has its own guidelines, most focus on battery capacity limits. you could take the bike without the battery and hire a battery at your destination, however you would need to pre-book this.
Tyre and Shock Care
Many airlines recommend deflating tyres and shocks partially. Leaving some air in your tyres can shield the rims, making a slightly deflated, rather than flat, tyre ideal.
Accessories
Apart from your bike, ensure you pack essential riding tools, nutrition, attire, helmet, sunglasses and other cycling necessities. If you need a guide to what to pack, check out our article The Ultimate Guide To Packing For Your Cycling Holiday. Finally abide by airline weight limits and be cautious about restricted items.
By thoroughly preparing and researching these aspects before your trip, you can ensure a smoother and more enjoyable bike travel experience. Take the time to assess your abilities, select an appropriate destination, understand local regulations, plan your itinerary and if you are worried about planning your own trip, take a look at our organised tours, where we take the strain and handle most of the logistics for you. The more you plan ahead, the more you can focus on the joy of cycling and exploring new horizons.
Bike Insurance: What is it and why do you need it?
As a cyclist, you may love to travel with your bike and explore new places. However, you would also be mindful of wonder how to protect your bike and yourself from any risks or accidents while you are abroad. That’s where bicycle insurance comes in. Bicycle insurance is a special policy that covers your bike from theft, damage, or loss, as well as your liability and medical expenses in case of an injury.
Travelling with your bike can expose you to various risks, such as:
- Theft
- Damage
- Injury
- Liability
To protect yourself and your bike from these risks, you may need two types of insurance: bicycle insurance and cycle touring insurance. Bicycle insurance covers theft, damage and vandalism to your bicycle. It can reimburse you for the cost of replacing or repairing your bike if it is stolen or damaged. It can also cover the cost of hiring a replacement bike while you wait for your claim to be processed. Cycle touring insurance is travel insurance that covers you for medical expenses, personal liability and other travel-related issues while you are cycling abroad. It can cover the cost of medical treatment, emergency evacuation, repatriation, cancellation, curtailment and baggage loss. Companies you may wish to consider are Pedal Cover, Yellow Jersey, Velosure Cycling Insurance, to name but a few. Typically they include cover for the following
- Cycle touring & leisure cycling
- Mountain biking including downhill racing & enduro
- Road cycling including training, charity events, sportives & racing
- Track cycling including racing
- Triathlon / duathlon including Ironman distance racing & training holidays
Travel insurance policies can also provide cover for the costs of emergency medical care and repatriation if you injure yourself while cycling on holiday, including heli-rescue when necessary in a medical emergency.
If you need cover as a professional, including coaching or as a group ride leader, this type of travel insurance is not suitable.
Not all bicycle insurance and cycle touring insurance policies are the same. Depending on the type of bike you have, the level of coverage you need, and the budget you have, you may want to compare different options and find the best one for you. I advise speaking to your insurance broker for more information.
One final note of caution, if you think that you can avoid the inevitable, we have had occasion where guests have had there bikes damaged in transit. They were unable to recoup the entire value of their bike from the airline as they didn’t have the correct insurance in place but also the airline have a maximum limit of compensation under the Montreal Convention.
Transporting Your Bike: The Options
Flying with Your Bike
This requires some careful preparation to ensure a smooth and hassle-free experience. Start by checking the airline’s policies and fees for transporting bikes. Some airlines require bikes to be packed in a specific manner, such as in a bike bag or case. Measure and weigh your packed bike to ensure it meets the airline’s size and weight restrictions. It’s advisable to make a reservation for your bike in advance to secure space. Arrive at the airport early on the day of your flight to allow time for check-in and potential inspections. Some airlines offer a ‘Twilight’ drop off service, especially if your flight is very early the next day. lastly but most importantly, upon arrival at your destination, inspect your bike for any damage before leaving the airport.
Taking Your Bike on Trains and Buses
Many trains and buses allow bikes on board, but specific rules and regulations vary. Check the policies of the transportation company you plan to use. Some may require reservations or have limited space for bikes.
Transporting Your Bike with a Car
If you want to take your bike with you on a road trip in your own country or you don’t like flying and decide to drive to your destination, you will need a reliable way to transport the bike with your car. You can choose to put your bike inside of your car or on the outside using a bike rack. You should choose the type that best suits your needs and preferences, as well as the compatibility of your car and bike.
Shipping Your Bike
If you prefer not to travel with your bike, shipping it to your destination is an alternative option.
Preparing Your Bike for Travel: Packing and Protection Tips
Now you have selected your mode of transportation for your cycling trip, you need to pack your bike it’s crucial to prepare your bike properly for travel. Packing and protecting your bike will ensure that it arrives at your destination in perfect condition, allowing you to fully enjoy your riding experience. Here I cover the the following topics:
1. Choosing a suitable bike bag or box
2. Removing and disassembling bike components
3. Securing and protecting your bike
4. Packing tips and techniques
Choosing a Suitable Bike Bag or Box
Firstly, invest in a quality bike bag or box that provides sufficient padding and protection. Look for one that is specifically designed for bike transportation, with durable materials and secure closures. Consider a bag with wheels for ease of movement, as you’ll likely have to navigate airports and train stations with it in tow. Other various factors to consider are your budget, preferences, and goals. You also need to consider the size,
weight, and protection of the bike bag or box. You need to consider the following aspects when choosing a suitable bike bag or box:
Bike Bag
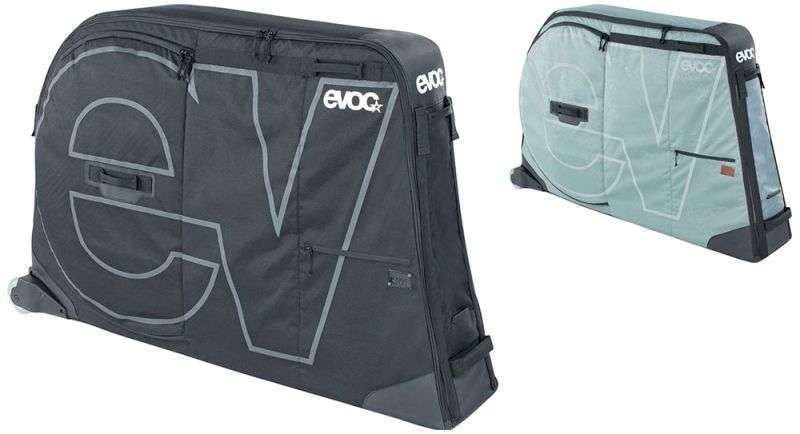
A bike bag is a soft-sided case that can fit most bikes without removing too many parts. It is usually lighter, cheaper, and easier to carry than a bike box. However, it may not offer enough protection for your bike from impacts or rough handling. Many soft cases provide protection against theft and damage with TSA-approved locks and padded frames. Soft bike bags are lightweight and can be easily stored when not in use. They often come with multiple compartments for accessories and extra padding to protect your bike. While they may not be as protective as hard-shell cases, they are a popular choice for cyclists who want a convenient and affordable option for occasional travel. Because they are light the bag and your bike inside should meet most airline requirements.
Bike Case
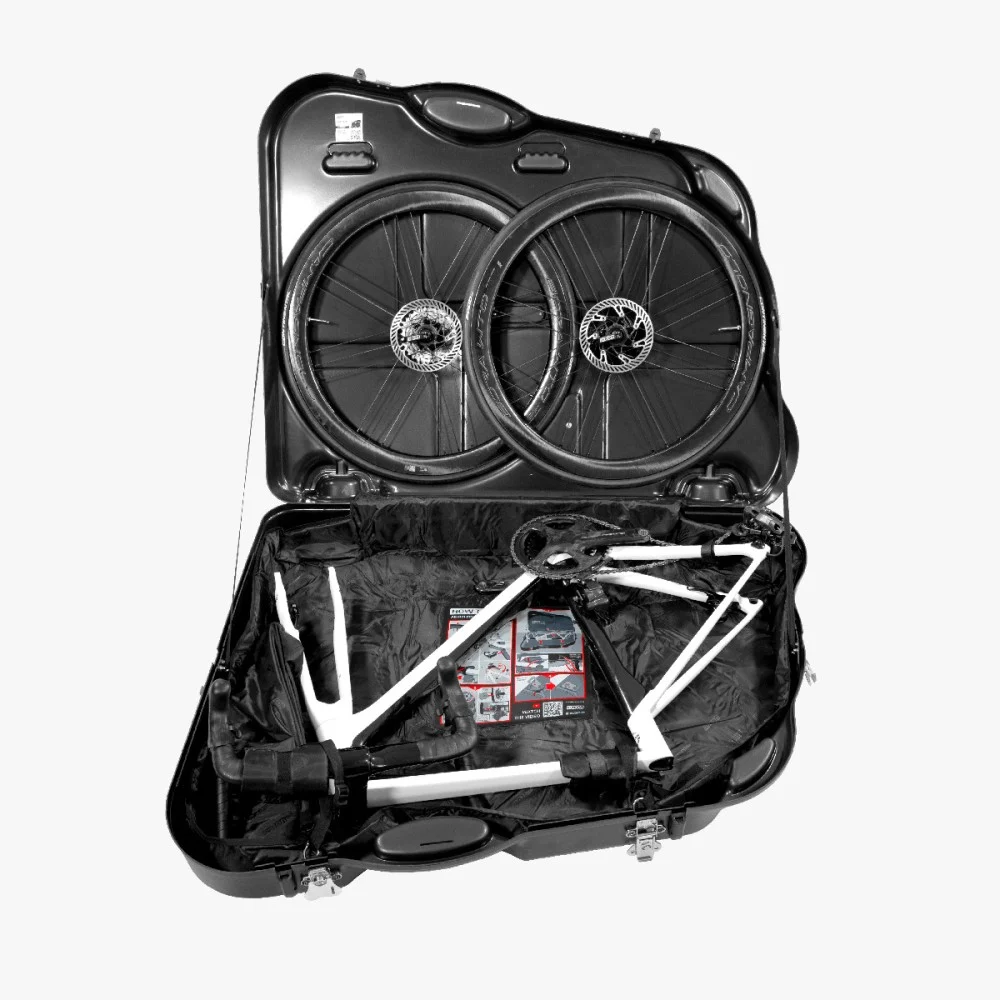
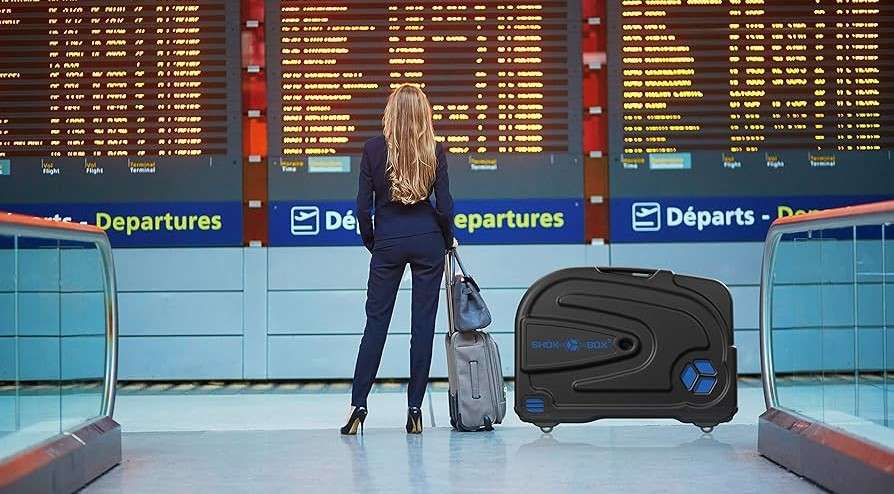
Hard-shell bike cases offer the highest level of protection for your bike. Made from durable materials like plastic or aluminium, these cases provide a secure and impact-resistant enclosure for your bike. They often come with additional padding and straps to keep your bike stable throughout the journey. Although hard-shell cases tend to be more expensive than bike boxes, they offer peace of mind and are perfect for those who frequently travel with their bikes or have high-end, expensive bikes they want to protect. Some manufacturers also provide TSA locks and the added security of gps tracking, so you know where your bike is at all times .
Bike Cardboard Box
A bike cardboard box is an affordable yet risky way to transport your bike for travel. You can get a bike cardboard box from your local bike shop or buy one online.
You will need to remove some parts of your bike, such as the wheels, pedals, handlebars, and seat post, to make it fit. You will also need to wrap your bike with bubble wrap, foam, or cardboard pieces to protect it from scratches or dents.
A bike cardboard box is not an ideal way to transport your bike due to transportation issues caused by the size, and it may not be very durable or secure considering weather conditions. Remember to check the condition of the box before and after each use and tape it well to prevent it from opening. Label the box clearly with your name, address, and contact details, and mark it as fragile.
Finally Keep in mind that extra charges or fees from the airlines can occur, as the box may exceed the size limits for normal check-in luggage.
TIP: Some airlines now require a bike bag or case for transporting bikes, and they may not accept boxes at all.
Dismantling and Reassembling Your Bike for Travel
Before the next step, it is wise to have your bike serviced and give it a thorough clean. Your bike is then ready to pack and the first thing to do is remove and disassemble some bike components depending on the bike bag or box chosen. This will help you reduce the size and weight of your bike, as well as prevent any damage or loss of the components during transport. You need to consider the following aspects when removing and disassembling bike components:
Pedals
You should remove your pedals from your bike using a pedal wrench or an Allen key. You should also mark the left and right pedals with tape or stickers to avoid confusion when reassembling them.
Wheels
Most boxes and cases require you to remove your wheels from your bike using the quick-release system or an Allen key. You should also deflate your tires to reduce the air pressure and prevent any punctures or explosions. For bikes with thru-axles, follow the manufacturer’s instructions for removal.
Handlebars
Again depending on your choice of bike bag or box you should remove or loosen your handlebars from your bike using an Allen key or a torque wrench. You should also loosen the stem bolts and rotate the stem sideways to align it with the top tube. Use tape or zip ties to fasten loose cables and secure them to the frame.
Saddle and Seat Post
You should remove your saddle and seat post from your bike using an Allen key or a torque wrench. You should also mark the seat post height with tape or a marker to avoid losing your saddle position.
Pro Tip: Disassembling a bike with complicated internal routing or with an integrated handlebar may require a mechanical background or outsourced assistance. However there are bike bag options which let you keep your handlebar and seat post in place requiring minimal disassembly for even first-time travellers.
Securing and Protecting your Bike
The next step in packing your bike for travel is to secure and protect your bike inside the bike bag or box. This will help you prevent any movement or damage to your bike during transport. You need to consider the following aspects when securing and protecting your bike:
Frame
You should secure your frame inside the bike bag or box using straps, buckles, or Velcro. You should also protect your frame from scratches or dents using foam pads, bubble wrap, or cardboard. Some cyclists opt for pool noodles that are cut to fit over the frame which is still light in weight. Another alternative is asking your local bike shop for the foam wraps that typically come with new bikes and is typically thrown away.
Wheels
You should secure your wheels inside the bike bag or box using straps, buckles, or a wheel bag. You should also protect your wheels from scratches or dents using foam pads, bubble wrap, cardboard or a towel. Some bags and boxes come with a suitable wheel bag. This is a padded bag that fits one or two wheels and is placed inside your bag or box.
Handlebars
You should secure your handlebars inside the bike bag or box using straps, buckles, or Velcro. You should also protect your handlebars from scratches or dents using foam pads, bubble wrap, or cardboard.
Saddle and Seat Post
You should secure your saddle and seat post inside the bike bag or box using straps, buckles, or Velcro. You should also protect your saddle and seat post from scratches or dents using foam pads, bubble wrap, or cardboard. Remember to mark where the seat post height with tape or a marker to avoid losing your saddle position.
Here’s a useful video that walks you through dismantling your bike and packing it into a dedicated bike bag:
Packing Tips and Techniques
The final step in packing your bike for travel is for me to offer some tips and techniques that can help you pack your bike more efficiently and effectively. You need to consider the following tips and techniques when packing your bike:
Use the right tools
You should use the right tools for removing and disassembling your bike components, such as wrenches, Allen keys, or torque wrenches. You should also use the right tools for packing and securing your bike inside the bike bag or box, such as scissors, tape, or zip ties.
Label your parts
Label your parts with tape or stickers to avoid confusion when reassembling them. You should also label your bags or boxes with your name, address, phone number, and destination to avoid losing them. I mentioned earlier that some box manufacturers provide gps trackers, however a more cost effective solution that you can use in bags and boxes, is the Apple Air Tag. There are other options available.
Take photos
You should take photos of your bike before and after packing it to have a record of its condition and configuration. You should also take photos of any damage or loss that may occur during transport to have evidence for any claims or complaints.
Weigh your bags or boxes
You should weigh your bags or boxes before leaving for the airport or transportation company to avoid any extra charges or fees. You should also check the weight limits and restrictions of your airline or transportation company to avoid any problems or delays. Remember to check the airline’s policies regarding bike transportation to avoid any surprises or additional charges. Some airlines require bikes to be pre-booked, while others may have specific guidelines on packing and dimensions.
TIP: Ensure you double check that you have not left out any screws, bolts or clamps. Don’t forget to add additional protection to delicate parts, such as the derailleur and rear derailleur, with bubble wrap or foam padding.
Post-Flight Maintenance: Essential Steps for Keeping Your Bike in Top Shape
Traveling with your bike can be an exciting and convenient way to explore new cycling destinations. But once you’ve safely landed and unpacked your trusty two-wheeler, it’s important to give it some post-flight TLC to ensure it’s in top shape for your upcoming rides.
First and foremost, after flying with your bike, give it a thorough visual inspection. Check for any signs of damage, such as dents, scratches, or bent components. Pay close attention to delicate parts like the derailleur hanger, dropouts, and frame. If you notice anything concerning, it’s best to have a professional bike mechanic take a look at it before hitting the road.
Flying with your bike can expose it to various elements, including dirt, dust, and even moisture. Use a mild bike cleaner and a brush to remove any residue, paying extra attention to the drivetrain, hubs, and brakes. Once clean, apply a fresh coat of lubricant to the chain and other moving parts. This will help maintain smooth and efficient operation throughout your rides.
Lastly, don’t forget to check and adjust your bike’s components. Flying can sometimes cause minor adjustments or loosening of the bolts and screws on your bike. Take the time to inspect and tighten all the important components, such as the handlebars, stem, seat post, and pedals. Additionally, ensure your brakes are properly aligned and your gears are shifting smoothly. If any adjustments are needed, consult your bike’s manual or seek assistance from a knowledgeable professional.
By following these post-flight maintenance steps, you can ensure your bike remains in peak condition for all your cycling adventures. Remember, a little bit of care and attention go a long way in keeping your bike running smoothly and extending its lifespan.
Dismantling and reassembling your bike for air travel may seem like a complicated process, but with a bit of patience and attention to detail, you can ensure that your bike arrives at your destination in perfect condition. By following this step-by-step guide and investing in a reliable bike box or bag, you can enjoy your cycling holiday or tour without any worries about transportation mishaps, allowing you to focus on your bike adventure and enjoy the road ahead.
Navigating Airlines and Transportation Companies: Important Regulations and Fees to Know Policies, Fees and Services
You need to consider the following aspects when dealing with airlines and transportation companies. Each airline has its own set of rules and fees when it comes to transporting bicycles. Some airlines treat bicycles as regular checked luggage, while others consider them oversized or sporting equipment. It’s essential to familiarise yourself with the policies specific to your chosen airline well in advance of your trip. This way, you can plan accordingly and avoid any surprises at the airport.
Booking: You should book your bike as checked baggage or cargo in advance to ensure availability and avoid any surcharges. You should also confirm your booking before leaving for the airport or transportation company to avoid any changes or cancellations.
Checking-in: You should check in your bike at the designated counter or area at the airport or transportation company. You should also show your booking confirmation, identification, and payment receipt. You should also inspect your bike for any damage or loss before handing it over.
Claiming: You should claim your bike at the baggage claim area or the cargo terminal at your destination. You should also show your baggage claim tag, identification, and payment receipt. You should also inspect your bike for any damage or loss before accepting it.
In Conclusion
Whether you’re an avid cyclist or just someone who enjoys an occasional ride, the thought of flying with your bike may seem daunting at first. However, with the right knowledge and preparation, it can be a seamless and enjoyable experience. The key is to plan ahead and follow a few simple steps. I have covered how to pack your bike for travel and how to remove and disassemble bike components, choose a suitable bike bag or box, secure and protect your bike with tips and techniques and deal with airlines and transportation companies.
If you’re travelling by air, it’s crucial to familiarize yourself with the airline’s policies and procedures for travelling with bikes. Check the specific requirements for packing, weight restrictions and any additional fees. Some airlines require advance notification or reservations for transporting bikes. It’s recommended to arrive at the airport early and approach the check-in counter with your bike packed and ready for inspection. For other transportation options such as trains or buses, check their specific guidelines and requirements for bike transportation, including any limitations on sizes or quantities.
All in all, flying with your bike can be an exciting opportunity to explore new cycling destinations. By being informed about airline requirements, properly packing your bike, and arriving early, you can have a smooth and hassle-free experience. So, grab your bike, book that cycling holiday, and get ready for an unforgettable adventure on two wheels. Happy flying!
Leave a Reply